Pages

Showing posts with label Black. Show all posts

Wednesday, September 2, 2015

OPI Venice Fall 2015 Collection - Mini Set Swatches


Hey beauties! Today I have a few of the OPI Venice Collection to share with you.  These are the colors that come in the mini set.  

Friday, October 24, 2014

Sally Hansen Halloween Insta-Dri Polishes 2014 - Swatches and Review


Hi beauties!  Today I have swatches of the Sally Hansen Insta-Dri Halloween collection to share with you.  There are 4 polishes from the set but I have 3 to share with you today


Scaredly Matte
I'm so in love with this matte from the collection. It's a black matte with a slight slick finish, so it reminds me of leather. This is a photo after it dried for about 30 minutes with no base coat. It did pretty well covering my ridges but they are still somewhat visible. I wore 2 coats here. 


Pumpkin Queen
A bright happy orange, perfect for Halloween. My picture mutes its a little, it's more of a bright tangerine cream (think Reeses Pieces orange). It was pretty opaque with 2 coats but I wanted to make sure there were no streaks so I applied a third coat. 


OMGhost
Okay I have to admit that I partially wanted this one because of the name.  OMG is a marshmallowy white cream. I used 2 coats to make it opaque.

I really like the fun colors for Halloween or anytime of the year. I'll definitely wear the black and white year round. I'm not sure if they are good for stamping because I haven't tried them out yet but most polishes from the Insta-Dri line are perfect for stamping.

The Halloween Insta-Dri's are limited edition and are available at retailers that carry Sally Hansen.  


~ Press Sample~

Wednesday, September 10, 2014

Upcoming OPI Collections for Fall 2014: Peanuts Halloween, Pink of Hearts and Designer Series - Swatches and Review


Hey beauties! Here are swatches of the upcoming OPI Collections for Fall 2014.


The Pink of Hearts Set contiains a nail file with charm, Mod About You and The Power of Pink. 

Mod about You - a bright light pink creme originally released with OPI Brights. Very cute pink that went on opaque in 2 coats. 
The Power of Pink - limited edtion. Sports a creamy gelly base with medium red/fuchsia and white hex glitter and matching microglitter.


The Peanuts Collection was created for Halloween 2014. There are 4 shades:

Who Are You Calling Bossy?!? - black creme, very shiny like a gelly without the thinness. Opaque in 2 coats.

Good Grief! - canary yellow creme. The formula has a medium thickness but still required 3 coats.

Where's My Blanket? - glitter mix in a clear base.  Sports orange, lime yellow, black medium hex glitter along with black microglitter. 

To Be or Not to Beagle - also a glitter mix in a clear base. Interesting combination of glitters that play well together. Sports red, medium blue, light blue, orange, yellow and black medium hex glitter along with black micro glitter for good measure. I'm in love!


The Designer Series polishes released are DS Titanium and DS Tourmaline.

DS Titanium - my absolute favorite out of all 3 collections. Has a titanium silver base and a holographic silver finish.  The glitter mix has medium blue, green and orange glitter combined with holographic microglitter. There may be other colors that come together to create this beautiful finish. Another stunning 2 coater.

DS tourmaline - for the pink lover in you. Tourmaline has a gelly pink base, but not to thin because it required two coats. It also contains a glitter and holographic mix that is difficult to see on the nail but flashes a slight holographic gold hue. 

My favorites from the collections are: The Power of Pink, To Be or Not to Beagle and DS Titanium!!!  I'm not sure when the collections will hit stores but they should be coming out soon. 


Thanks for stopping by! 


* Press Sample  * 

Sunday, February 9, 2014

Valentine's Day Nails


Hello everyone. Today I have Valentine's Day nails to share with you.  Can you believe the 14th is right around the corner?


Sunday, September 1, 2013

How I Shaped My Nails into Almond Shape (Baby Stillettos)


Hello everyone! I hope you're enjoying this holiday weekend. I finally have a day off and was excited to play with my nails. You may have noticed I've been trying to grow out my natural nails. I've worn square/squoval for a couple of years now and wanted to switch things up a bit, so I decided to try almond shape nails. I think I first fell in love with almonds when I saw Adele sporting them. Her fingers looked so long and elegant with the extended shape. 

Since my nails are short I couldn't create extremely long almonds (stilettos), so I'm going for the baby stiletto/almond version. Stiletto's are actually more pointy, but you know what I mean. 

Here's a video showing how I went from round to almond nails:

And here are the finished results:

The polish I'm wearing is Klean Color Black. I just painted black over my Chalkboard nails to allow me to shape them better. It was a lot easier than I thought it would be. 

I really like this nail shape so far. I'm not sure how long I'll be able to grow out my natural nails with this shape, but it will be fun to see.  

 Thanks for stopping by my blog today. Have a great weekend :)


Friday, July 26, 2013

China Glaze On The Horizon Feather Collection Fall 2013 - Swatches and Review


Hey lovelies! Today I have swatches of the new China Glaze On The Horizon Collection to share with you. I thought these would be really cute for the Fall so I scooped them up. There are 6 feathers (mini bar glitters) in the collection of various colors. Most of them have Fall inspiration with hints of orange and black and would be great for the Halloween season.

I swatched them over black and white. My first 2 nails have a black base, and my last 2 have a white base.


Sunday, July 7, 2013

Fing'rs Get Spotted versus OPI Spotted, Swatches and Review


Hello everyone! I was out and about and found the Fing'rs Heart 2 Art nail display. This display is loaded with nail stickers, glitter, tape, brushes, water decals and even a stamping kit. I was so excited because I was able to snatch up the OPI Spotted dupe called Get Spotted.

Application is tricky and similar to crackle polish. You have to make sure the base color is dry and the polish is smooth. I created a video that shows the application (good and bad). I even made a mistake during application, LOL. But it shows how tricky the polish is. For the base, I used 2 coats of the pink and black that came in the kit.


I then polished my right hand with OPI Spotted for comparison. I prefer the look of the OPI, but for $7 the price of Get Spotted can't be beat (unless you use the alcohol water marble).

Overall I believe the polish does work, but it's tricky to work with. I had to use very little polish to create spots, and when I say very little, I mean very little. I would even go as far to say wipe off the brush completely and start there. 

The effect is similar to OPI but more striated than spotted. The look reminds me of crackle polish. 


I purchased Get Spotted for about $6.57. Some of the other embellishments were about $2.50. I also got a few of the water decals. Gotta love those for 2 bucks.

The Fing'rs Heart 2 Art display can be found at Wal-Mart. 


Thanks for stopping by!


Tuesday, June 25, 2013

NOTD and Nail Stamping Tutorial


Hello everyone! Sorry I haven't posted in sooooooooooooo long. To be honest, I've just been a little lazy and kicked back for the summer. I've been in permanent vacation mode, LOL. 

My nail of today is a look I completed with a combination of nail stickers and nail stamping. The stickers (middle finger) were purchased from my local beauty supply store.  I created the stamped images with Pueen  36, from the Love Elements Set, purchased from Amazon. Base colors are Zoya Dana, Wet N Wild White and Finger paints Black Expressionism. I also stamped with the same Finger Paints Black and Konad White. 

I have on 3-4 layers of polish to help create a protective layer over the nail. It helps prevents nail chipping and tearing at work. 

And here's the nail stamping tutorial. Check it out to see how I created this look. 

Thanks for stopping by!


Sunday, May 12, 2013

Happy Mother's Day!


Happy Mother's Day to all of the hard working Moms out there! Today I'm hanging out with the family and enjoying the beautiful weather but I also wanted to share my nails I did yesterday. I used home made Betty Boop decals and DRK A.

Hope you like this mani. You can check out details on how I made the decals in my video.


Thanks for stopping by!

Monday, April 8, 2013

Fing'rs Nail Edge Tattoos


Hello Beauties! Today I wanted to share my nail of the day using Fing'rs Nail Edge Tattoos.You may remember them from my haul post.  I purchased the from Wal-Mart for about $8. The set contains 3 different designs (tattoos), which are basically water decals. I choose the map image to try. 


The application was super easy, even easier than some other water decals I've tried in the past. I used the beige and grey that came in the box, Finger Paints Black Expressionism and Creative Candy Apple Red.

To see the transfers in action check out my latest video.  


Thanks for stopping by :)


Thursday, April 4, 2013

NOTD DRK-B Pink Dots & Hello Kitty


Hello beauties. Just a quick nail of the day. I was going to change my mani but decided to stamp over it using the DRK-B image plate. My base is Julep Teri, a dusty tangerine, that chipped after a days' work. I'm not sure if Julep doesn't play well with Orly, but I had a difficult time applying it over Orly bonder.

For the stamping polish and accent nail, I used Born Pretty's pink polish which is more of a neon fuschia when used as a polish base.


My daughter also wanted to share her mani stamped using Sylvia's Hello Kitty image plate. Sorry for the lack of clean-up but I don't apply acetone to my daughter's skin (if I can help it).  I usually just let the excess polish wash off in the shower.


That's all for tonight. Thanks for stopping by :)


Monday, March 25, 2013

Zoya PixieDust Matte Sparkle Spring 2013 Collection - Swatches and Revew


Hello beauties! Today I have the Zoya PixieDust Collection to share with you.  The collection consists of 6 matte textured polishes that look great alone as well as with a top coat. 

"This newly developed formula is sure to captivate with a magical sparkle and sugary finish like no other.  The color experts at Zoya have created six, long-wearing stunners for the introduction of this look."


Chyna - lovely pomegranate textured polish with shades of deep crimson and red glitter. I'm in love with the color.  Very stunning. 

It reminds me of Ruby Pumps when glossy but far more interesting. It almost has a jelly look, where you can see through layers, when a top coat is applied. 

Dahlia - intense graphite black sand with silver glitter throughout. It looks amazing on the nail and the glitter really pops when a top coat is applied. I used 2 coats of Dahlia.

Dahlia with 2 coats of clear to glossify. Isn't this a beauty?

London - smokey grey with silver glitter throughout. I used 2 coats to achieve this look. 

London with 1 layer of top coat. 

Godiva. Soft nude sparkle. It reminds me of All Hail The Queen but with more sparkle. I used 2 coats. 

Godiva with 1 layer of top coat to glossify. 

Nyx - bright periwinkle sand with shimmering glitter throughout. Very soft and feminine.  The formula on Nyx was a little thinner than the others.  I used 2 coats. 

I added another coat plus a top coat to glossify. 

Vespa - mint kiss sparkle. Another soft and feminine sand color with shimmer throughout. I used 2 coats. 


A base coat is not recommended to be used with the polish. I didn't use a base coat when I swatched them and they applied smoothly without any problems.  A top coat is not recommended in order to create the Pixie Dust matte effect but I added it just for fun to see the outcome.

Overall the collection is great. Textured polishes are a nice switch from the norm and are very interesting to look at on the nail.  They're not too gritty and won't snag your hair.  They also look amazing glossified so it's like getting 2 polishes in 1.  Plus they all have that hidden glitter shimmering effect which creates a sparkle on the nail.  The brights are pretty for a soft look but for striking glamour go with the intensified black and red, Chyna and Dahlia.

The PixieDust Collection is available at Zoya.com. $8.00 each (US)


Ultra long-wearing, glossy nail lacquers by Zoya are BIG5FREE - all formulas are completely free of harmful industrial chemicals such as toluene, camphor, formaldehyde, formaldehyde resin and dibutyl phthalate (DBP) that are known to cause cancer and birth defects.

Find over 300 stunning Zoya colors on www.zoya.com.

Each and every color has a name as unique as the women who inspired it.

*Sent for an honest review*

Monday, February 11, 2013

Best Red for Stamping


I sprang my knee this weekend, so I had a lot of sitting time.  I decided to go through my red polishes to figure out the best red for stamping.  Sounds easy, but with so many reds it took longer than I thought. I was more interested in red over black because most reds stamp pretty good over white.

Wednesday, January 30, 2013

Getting Ready for Valentine's Day


Today's mani is Valentines Day inspired. For the base I used Sally Hansen Crinoline a very pale nude. Then topped it off with I Love Nail Polish Animal Cookie. For stamping I used Messy Mansion and Fauxnad image plates with Sally Hansen Presto Pink (middle) and Magenta Motion (pinky).

A slightly closer view to show the details in the glitter. 

I hope you like this mani as much as I do. Thanks for stopping by :)


Saturday, January 19, 2013

OPI Mariah Carey Spring 2013 Collection - Swatches and Review


Today I have the Mariah Carey Collection to share with you.  Being a long time fan, I was very excited to hear that OPI would launch this collection. I had read about her love neutral polishes so I never expected her line to include glitter or more unique polishes. The set includes 8 polishes, 4 of which are Liquid Sand or textured polishes as I like to call them.

First I'll show you the non-sand polishes. 


A Butterfly Moment
A Butterfly Moment is a mauve pink with a slight shimmer and the only neutral in the line. From the look of the bottle I thought the formula would be more sheer but it's actually more opaque. It went on smoothly in 2 coats. 


Sprung
A golden rose-bronzy shimmer with a very thin formula. I had to use 4 coats to achieve this look. It's very pretty and reminds me of Warm and Fozzie but with more red and less depth. 


Pink Yet Lavender
I topped off Sprung with the only glitter from the line, Pink Yet Lavender. I used one thick coat.  PYL is a gorgeous holographic glitter with small and medium hex glitter throughout. It almost reminds me of Teenage Dream but it's turned up about 4 octaves. Very glamorous!


Anti-Bleak
I haven't heard much buzz about Anti-Bleak but it's really beautiful. A vibrant plum that applied smoothly in 2 coats. A surprise favorite. 


Now let's take a look at the Liquid Sands. I love an interesting textured polish.

The Impossible
A bright cherry red that leans more pink. Is that even possible?  The base is more pink with red micro and medium hex glitters. It even has star glitter! I applied 2 thin coats which dried in about 5 minutes to a matte finish. 


The Impossible with Topcoat
Even more beautiful when wet. I applied 2 coats of Gelous Nail Gel Coat to achieve a smooth look. 


Stay the Night
This was love at first sight. In original pictures I thought the glitter was red, but it's actually more of a pink-fuchsia. I used 2 thin coats.

Stay the Night with Topcoat
I followed up with 2 coats of Gelous to achieve a jellied effect.  I love the glossy look!


Can't Let Go
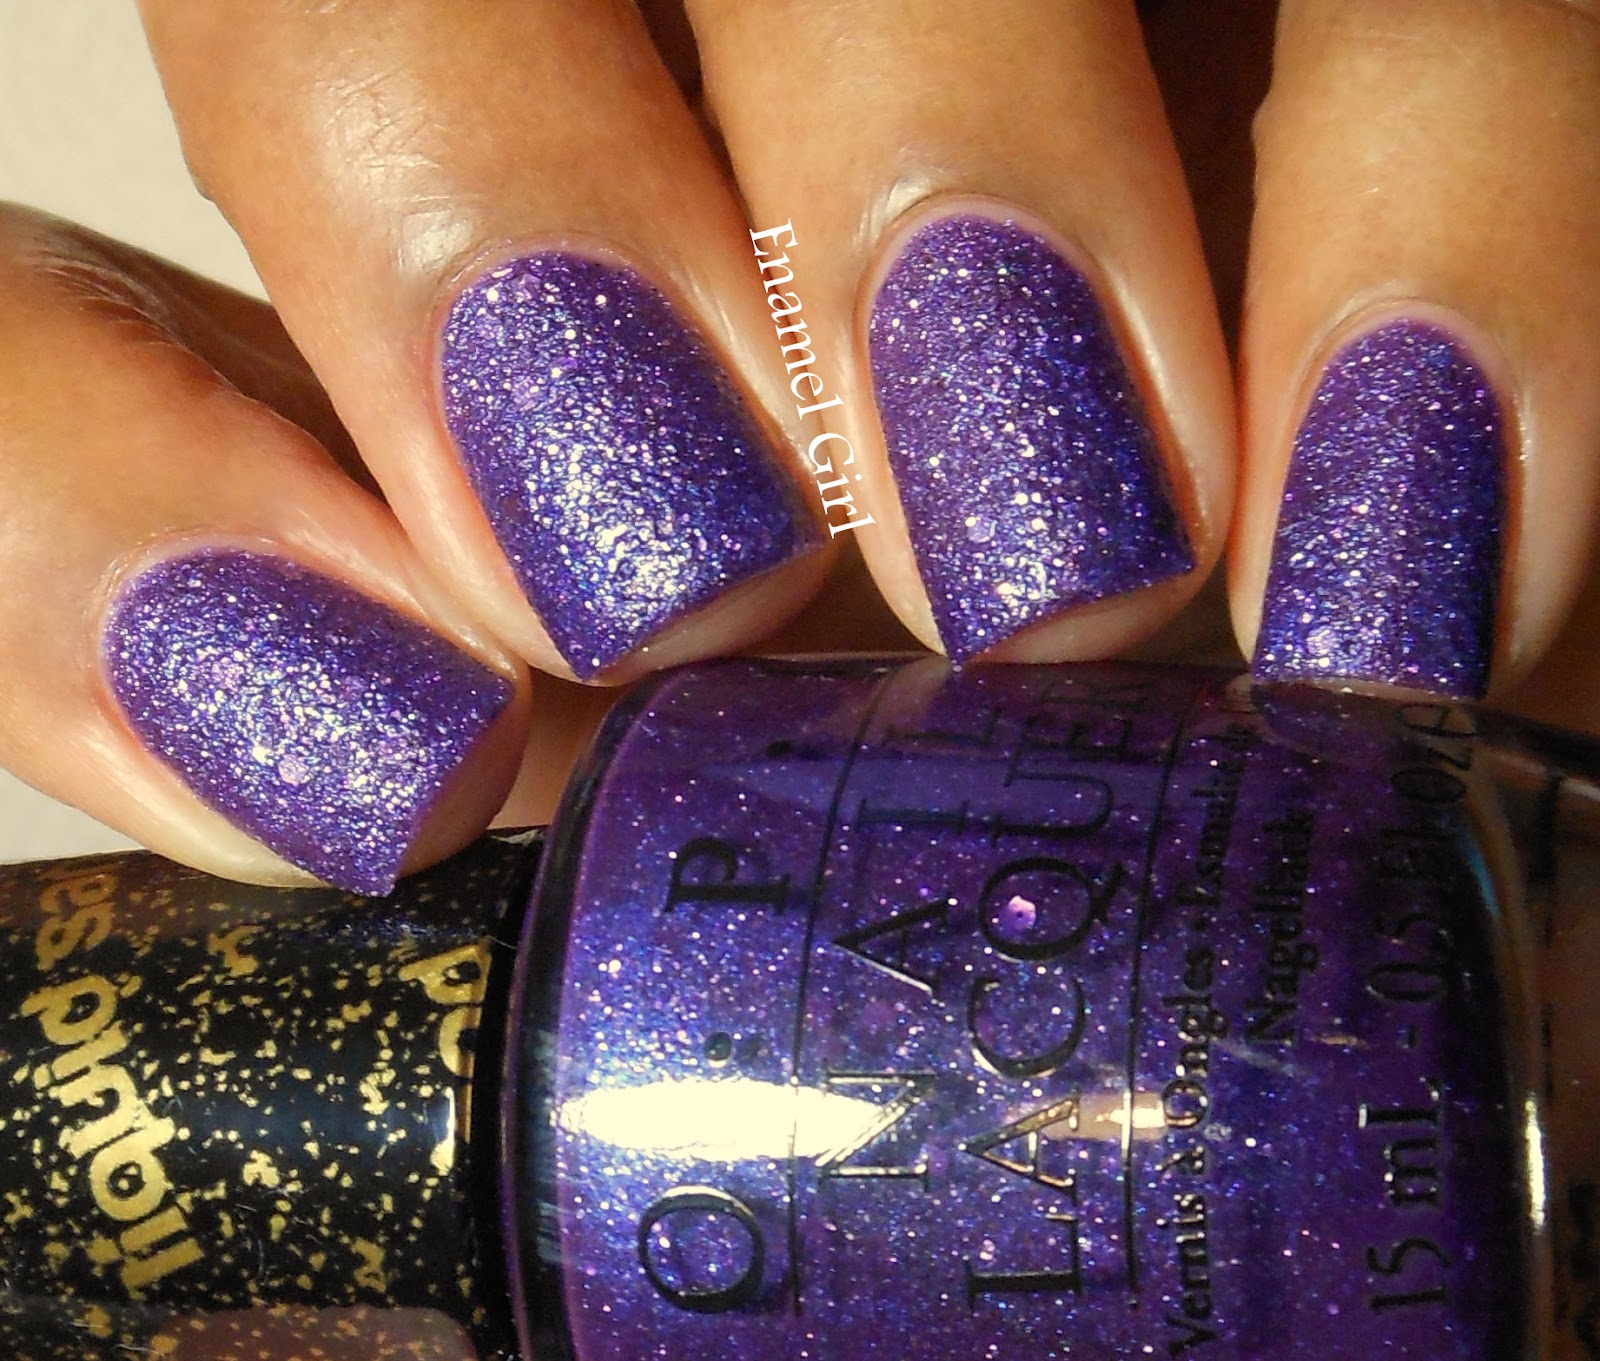
Very stunning purple sand effect. It's much deeper and vibrant than my camera could capture. A surprise favorite. I used 2 thin coats.

Can't Let Go with Topcoat
I used 2 coats of Gelous to achieve the high gloss effect. This was the only sand that didn't look like a jelly with a topcoat but it's still gorgeous. 

Get Your Number
Another gorgeous sand, this time in a beautiful blue. I love how textured it is, like blue concrete. My camera made it about a shade lighter for some reason. I used 3 coats here because I tried to make it darker, but only 2 are necessary. It took about 15 minutes to dry because I used so many coats. 

Get Your Number with Topcoat
Looks amazing with a topcoat added. I used 2 coats of Gelous again to achieve this look. 


If you haven't noticed, all of the Liquid Sands get lighter when they dry and are closer to the color in the bottle when wet. Drying time varied from 5-15 minutes. The thicker the coat the longer it takes to dry. Most of them only require 2 very thin coats. When I noticed how dark the blue got with additional coats, I kept applying it, but it wasn't necessary. Instructions say no topcoat is required, but they are so pretty with a topcoat on, and most of them look like jellies layered over a glitter polish.

Overall I really love the collection, especially the Liquid Sands. Some people may not like this look, but I find them very interesting on the nail, and a good change from cremes. At least they came out with a mini collection so that you can sample each color before committing to large bottle. My favorites from the collection are Stay the NightCan't Let GoAnti-Bleak and Get Your Number.

The OPI Liquid Sands are now available at fine retailers that carry OPI.


*Sent for Review*

LinkWithin

Related Posts with Thumbnails