
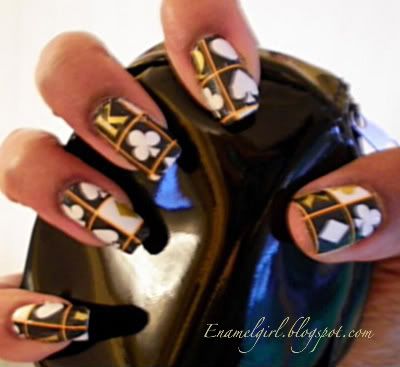
Foiling is an easy way to create an impressive look with little effort. I've gotten a few questions about my technique so I prepared a quick tutorial. I choose this design because I thought it was unique, but foils can also be used for a more conservative look.
Before beginning, apply your basecoat + polish and allow to dry completely. If your nails are not strong (like mine), I recommend at least 2 layers of polish to provide stability. Foils are paper thin and will not provide support as nail polish does.
Products you'll need: foil glue, foil and cotton swab:
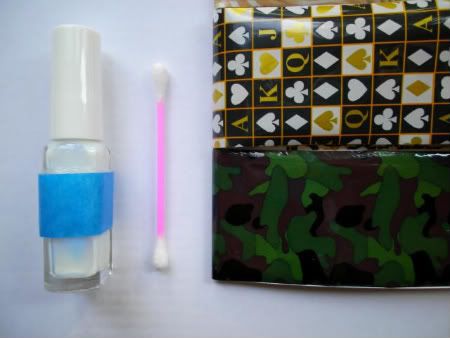
Select your favorite foil and cut into squares, then follow the steps below.

1. Apply a thin layer of glue and allow it to dry, about 2 minutes. The glue will turn clear.
2. While holding the foil, straighten it with your fingers so that its flat and not curved. Apply it to the nail. (Straightening the foil will help alleviate wrinkles and allow for a better application). Aim for the middle of the nail, it will serve as the base of the design.
3. Using a cotton swab, smooth the foil in the middle from the base to the tip. Smooth the right side, then left (or vice versa). Continue to smooth until the entire nail is covered.
4. Eventually the foil will lift on its own. Be careful not to smooth too roughly or the foil could fall off. Its important for the foil to stay in the correct place or the design could overlap or color go into the wrong section. If you have to, you can hold one corner in place with the adjacent finger (this may take some practice). Slowly lift the foil to reveal the design. Don't abruptly remove it. If you see any missed spots while lifting, simply push it back down and keep smoothing. Continue to smooth and lift until you have the results you want.
Apply your favorite topcoat and you’re done! Clean leftover foil with acetone or remover.

Other Hints/Tips:
-Foils are very thin and are not durable. A daily topcoat will help maintain your mani.
-Foil glue attracts cotton. Avoid leaving cotton on the nails from cotton balls/pads. Nails sponges are best.
-Non-metallic foils are easier to work with and require less precision.
-Nail polish can also be used to hide missed spots (although it may be difficult to match).
-Polish color can affect the final result, especially if the foil is transparent. Selecting a color close to the foil is best to help hide imperfections.
_____________________________________________________________________
That's all I can think of for now. I hope you found this helpful and not confusing. Please let me know if you have any questions.
The foil was purchased from http://foilsonline.com/ and the glue was purchased from http://dollarnailart.com, I am not affiliated with either company.
Thanks for this tutorial :) It's very helpful to me <3
ReplyDeleteThanks for this easy-to-follow tutorial :) Got loads of foil from dollarnailart, but I didn't know what to do with it, now I know and I shall give it a try very soon :) x
ReplyDeleteOMG!! ur foils are awesome....thanks for the tutorial...
ReplyDeletei want some foil like urs... waaaaaaaaaaaa!!! where i can buy those? can u give us a link?
ReplyDeletethis is great! always wondered about foils and how to do this...you make me want to try doing this! thanks!
ReplyDeleteMaricela
vividfusion.blogspot.com
great post!the foil you use is very pretty!
ReplyDeleteWonderful tutorial! Thanks so much for doing it, I've always wondered how you foiled. I'll have to purchase some foil myself and give it a go!
ReplyDeleteGreat tutorial, I just got my first order of foils from dollar nail art today and can't wait to try it!
ReplyDelete-Anita
http://splashingsofserendipity.blogspot.com/
Ver nice, Thanks for the tutorial!
ReplyDeleteYou're welcome ladies :)
ReplyDelete- Thriszha I bought the foil from http://foilsonline.com/ The only problem I had with them was getting the wrong color foil. The camo foil above was supposed to be pink, lol.
OMG, I'm inlove with this foil stuff! Oooow, how I'd like to try that myself! The design is lovely and thank you very much for explaining how this works. LOVE your nails! <3
ReplyDeleteThanks so much for the tutorial. This looks gorgeous!
ReplyDeleteGreat tutorial; thanks for taking the time to document this!
ReplyDeleteTiana & ABOP, thanks for reading. I hope I explained it well enough.
ReplyDeleteKarenD, I wanted to make a video but I couldn't download the software. At some point I'll figure it out :)
i love this,nice tutorial!
ReplyDeletenice foils !!!
ReplyDeleteThanks Shell and Lily :)
ReplyDeleteNow that's a handy tutorial! Foils are still on my wishlist, but I heard from several people that they're hard to use, so I haven't dared yet. Yours are always flawless, and with this tut I think it'll be a lot easier!
ReplyDeleteThank you so much for this tutorial!
ReplyDeleteI was too scared to try nail foils because I read that they are so hard to apply but you make it look so easy. I think I'll give them a go.
Thanks Shiny and Cel. I had to practice a few times before I got used to foils. Now I think they are pretty easy. I found they turn out best when I'm not rushing. I'll post another tutorial on tips to hide foil imperfections :)
ReplyDelete