Tuesday, June 25, 2013
NOTD and Nail Stamping Tutorial
Tuesday, March 26, 2013
Monster High DYI Nail Decals
Here are the steps to make the decals. If you're familiar with stamping it's pretty easy. Stamp the image and allow to dry. Then paint directly onto the stamper, allow to dry, peel off and apply to your nails. Messy Mansion has complete, more detailed, directions on her website. A helpful hint is to make sure your stamper is completely clean or the polish will transfer onto your decal.
To fill in the image I used Born Pretty's nail art brushes. If you don't have a nail art brush, you can also use a toothpick but the results won't be as precise.
Saturday, August 13, 2011
Dry Water Marble + Tutorial
Anyways, today I wanted to share a fun idea for those that have not mastered the water marble or just plain hate dealing with all the cleanup. I was talking to some friends at LHCF that wanted to do a water marble on toes. I never thought to do this but another member had seen CND do it on wax paper.
The idea is to create the marble on paper then transfer it to your nails. I'm not sure why they called it the Butterfly Effect but it looked pretty easy to do. It's the same concept as ziploc bag decals: create your design on a ziploc, allow it to dry, then transfer it to your nails. It's not a pretty as the water marble but it's a good substitute. I may be able to do better designs with practice but it's not bad for a first try. I included a tutorial below. Enjoy :)

Add a few more colors to marble with. I used Avon Blue Shock, OPI Banana Bandanna, Studio M Energy Star and China Glaze Custom Kicks.
Use a toothpick and draw lines to combine the colors.

You can either peel off the entire section or cut off a piece at a time.
I recommend cutting a small piece. The polish is thin and will fold over on itself.

Your nail polish must be slightly wet/tacky in order for the marble to adhere!!!

Press the marble into the tacky polish like you're applying a nail decal. Remember to cover the edge. Use your tweezers or toothpick to push through. I like to use scissors but I don't recommend them.
Wednesday, March 2, 2011
Peacock Manicure Tutorial
-image plate M70 (loopy french tip)
-4 of your favorite nail polishes or water paints
-toothpick (optional)
Let's get started: First, select your colors. I chose blue, green, purple & gold Orly polishes. Click here to see the complete list. You can use whatever colors you like! I think this mani would also look great in purple & gold with blue dots/highlights. Don't be afraid to mix it up!
Paint your basecoat and 1 coat of white or off-white polish. The white will intensify the nail color and help protect your nails from stains.


Stamp the image from plate M70.


Keep stamping until the nail is full. If you have longer nails you may need 4-5 stamps, shorter nails 1-2 stamps. Don't worry about perfecting your stamps. It will still look great :)

Using your highlight polish/paint, draw lines in the middle of the loops/eyes. I choose Orly Glitz & Glamour and used the brush from the polish bottle. For thinner stripes, use a toothpick dipped in polish and drag it in the middle of the loop. I like this effect the best because it looks more 3-D.
Allow the polish to dry for 10 minutes, then apply your favorite topcoat and you're done!!! Here's the end result.

Ta-dah! A super easy and eye catching mani. This is great if you're not a perfect polisher or stamper. The loopy lines are imperfect so mistakes are not very noticeable. I hope you enjoyed this tutorial! Click here to see the completed mani.
Monday, August 2, 2010
Foil it Up!!! Nail Foil Tutorial

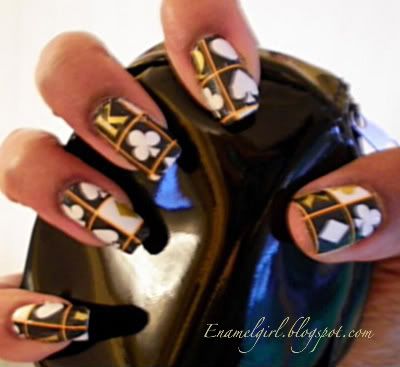
Foiling is an easy way to create an impressive look with little effort. I've gotten a few questions about my technique so I prepared a quick tutorial. I choose this design because I thought it was unique, but foils can also be used for a more conservative look.
Before beginning, apply your basecoat + polish and allow to dry completely. If your nails are not strong (like mine), I recommend at least 2 layers of polish to provide stability. Foils are paper thin and will not provide support as nail polish does.
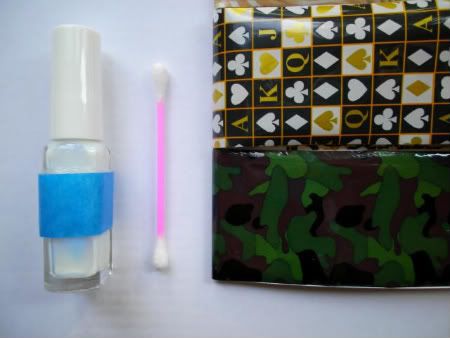
Products you'll need: foil glue, foil and cotton swab:
Select your favorite foil and cut into squares, then follow the steps below.
1. Apply a thin layer of glue and allow it to dry, about 2 minutes. The glue will turn clear.
2. While holding the foil, straighten it with your fingers so that its flat and not curved. Apply it to the nail. (Straightening the foil will help alleviate wrinkles and allow for a better application). Aim for the middle of the nail, it will serve as the base of the design.
3. Using a cotton swab, smooth the foil in the middle from the base to the tip. Smooth the right side, then left (or vice versa). Continue to smooth until the entire nail is covered.
4. Eventually the foil will lift on its own. Be careful not to smooth too roughly or the foil could fall off. Its important for the foil to stay in the correct place or the design could overlap or color go into the wrong section. If you have to, you can hold one corner in place with the adjacent finger (this may take some practice). Slowly lift the foil to reveal the design. Don't abruptly remove it. If you see any missed spots while lifting, simply push it back down and keep smoothing. Continue to smooth and lift until you have the results you want.
Apply your favorite topcoat and you’re done! Clean leftover foil with acetone or remover.

Other Hints/Tips:
-Foils are very thin and are not durable. A daily topcoat will help maintain your mani.
-Foil glue attracts cotton. Avoid leaving cotton on the nails from cotton balls/pads. Nails sponges are best.
-Non-metallic foils are easier to work with and require less precision.
-Nail polish can also be used to hide missed spots (although it may be difficult to match).
-Polish color can affect the final result, especially if the foil is transparent. Selecting a color close to the foil is best to help hide imperfections.
_____________________________________________________________________
That's all I can think of for now. I hope you found this helpful and not confusing. Please let me know if you have any questions.
The foil was purchased from http://foilsonline.com/ and the glue was purchased from http://dollarnailart.com, I am not affiliated with either company.


