Pages

Showing posts with label Marble. Show all posts

Sunday, October 23, 2011

Halloween Mani 7 - Dry Halloween Marble

Just a quick post to share my last mani for Halloween Week. It turned out better than I expected and thank goodness because I was running out of ideas!

Products Used:
NYC In a New York Minute Quick Dry Polishes:
* Gold -
Backstage Brown
* Orange -
Pumpkin
* Black -
Blackula

(Sunlight)

The gold and orange are both shimmer polishes which adds a little more interest to the marble.
(Indirect Light)

And that's a wrap for my Halloween week! I hope you enjoyed.


~The polishes above were sent to me for review~

Saturday, August 20, 2011

Dry Marble - Take Two

Hello everyone. Hope you're having a great Saturday! I had a fun day of doing absolutely nothing. Hubby and I watched the move "Take Me Home Tonight" an 80's based romantic comedy. It was pretty funny and reminiscent of my college years of partying. I wish I could go back there again, lol.

I had a lot of free time today since I'm caught up on most of my school work (for a change) so I played with dry marbling again. Someone had asked about using cheap-y polishes so I tried them out for this marble. I did three different combinations but this one turned out the best. I think the foil polish really adds a little somethin' extra to it. I'm gonna save the other two and try them out later.


The colors I used are: Wet N Wild Bar-B (light pink), LA Colors Electrified (pink foil), Wet N Wild Jubilee (medium purple) and Arissa dark purple shimmer (no name).

I applied them the same was as in the marble tutorial. Yes, it does looks like a Laffy Taffy (ha ha).

Here's what they look like on a Ziploc bag. I tried to make them look similar to a water marble. I only used 1 and a half rows for a complete mani. I'm saving the others for next time.

We'll I hope you're having a fun night. I gotta go hang out with Hubby. Thanks for stopping by!


Saturday, August 13, 2011

Dry Water Marble + Tutorial

Happy Saturday! Hope you're enjoying your weekend so far :) Sorry for my disappearance this week. I'm still working at the hospital and it's quite an adjustment to wake up at 5am, especially if you're not a morning person :(

Anyways, today I wanted to share a fun idea for those that have not mastered the water marble or just plain hate dealing with all the cleanup. I was talking to some friends at LHCF that wanted to do a water marble on toes. I never thought to do this but another member had seen CND do it on wax paper.

The idea is to create the marble on paper then transfer it to your nails. I'm not sure why they called it the Butterfly Effect but it looked pretty easy to do. It's the same concept as ziploc bag decals: create your design on a ziploc, allow it to dry, then transfer it to your nails. It's not a pretty as the water marble but it's a good substitute. I may be able to do better designs with practice but it's not bad for a first try. I included a tutorial below. Enjoy :)


Tutorial


Apply your base color to a zip-loc bag.

Add a few more colors to marble with. I used Avon Blue Shock, OPI Banana Bandanna, Studio M Energy Star and China Glaze Custom Kicks.
Use a toothpick and draw lines to combine the colors.


He're the finished look. Allow to dry a couple of hours.

Apply base color while waiting for the marble to dry.
Once dry use tweezers to lift from plastic.

You can either peel off the entire section or cut off a piece at a time.
I recommend cutting a small piece. The polish is thin and will fold over on itself.

Apply the cut section to your nail.
Your nail polish must be slightly wet/tacky in order for the marble to adhere!!!

Press the marble into the tacky polish like you're applying a nail decal. Remember to cover the edge. Use your tweezers or toothpick to push through. I like to use scissors but I don't recommend them.


Tear off the excess and tahdah!

Apply your favorite topcoat and don't forget to cover your edges.
You're done!
Let me know if you try this out. I would love to see different colors and designs!


Saturday, October 30, 2010

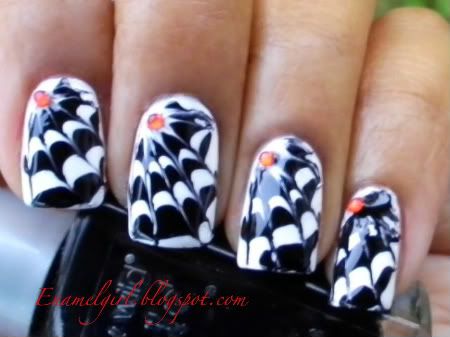
Spider Webs & Candy Corn

Today I want to share my spider web mani inspired by MySimpleLittlePleasures and NailStory They both had great spider web manis and used different techniques. Colette used a water marble and NailStory used the toothpick method. I also used the toothpick method, otherwise known as the "dry marble" technique, where you take a toothpick and blend the colors. The effect was a little more dramatic than I wanted but still turned out pretty neat. Its great if you want a similar effect without using water or a quick dramatic Halloween look.


I also had to sweeten it up and try the candy corn manicure inspired by Brook. I used WnW white, Sunkist Paradise (orange) and Essence Sundancer.

Thanks for stopping by! I have one more Halloween look to share tomorrow :)

Wednesday, July 28, 2010

Blue Ice Water Marble

I gave water marbling a try again. I originally wanted to use lemon and lime, but they didn't work so well together. I wanted my nails bluer, but as you know, marbling can be unpredictable. I'm happy with the results though :)

Please excuse any messiness. I didn't realize I was out of tape until I started (he he). So clean up was a drag. The pics are from day 2 and I still couldn't get them totally clean.

Products used:
Nicole - It's Up to You
Wet n' Wild - Bijou Blue
LA Colors - Live

(Sunlight)

(Shade)


Thanks for stopping by today. Have a great polishing day!

LinkWithin

Related Posts with Thumbnails